Getting Windows 11 Up and Running
For those savvier users, installing Windows 11 from the flash drive is just like if you were doing it from a Windows 10 or other OS flash drive: you can boot to it and perform a clean install, or you can perform an in-place upgrade from running the setup.exe file on the flash drive. More detailed instructions are provided below for either method.
Specifications
The flash drive mailed to you is at least a 16GB USB 2.0 drive that can be used to install Windows 11 version 21H2 on any PC already compatible with Windows 10. This is a modified 64-bit ISO that allows for install on Legacy and UEFI systems, without Secure Boot or TPM 2.0, which are both required if you were to regularly install Windows 11 from Microsoft.
This is the latest stable feature build (Version 21H2) for Windows 11 - no leaked ISO or illegal/insecure means of installing Windows 11 necessary.
No product key is included but Windows 11 automatically activates if your computer is already running a licensed version of Windows 10 (and may even activate if your computer runs Windows 7, 8, or 8.1) and you choose to install a matching version of Windows 11 (for example, a PC already running Windows 10 Home will activate Windows 11 Home with no problem, but you won't be able to activate a different version of Windows 11, like Pro or Enterprise - at least not without another product key).
The benefits of this flash drive over other options:
- Completely legal, safe, and provided officially by Microsoft
- No risk of malware or payloads that could be baked into unofficial installation files, as this installer is a UUP dump of the ISO from Microsoft's own servers
- Updated Settings menu design, Microsoft Store, and other latest features to test out in Windows 11
- Official updates from Microsoft
- Installer is modified to work with most computers that already work with Windows 10: no TPM, Secure Boot—not even UEFI boot mode is required, something not even Microsoft supports. If you want Windows 11 and don't know how to extract or splice ISO files and Microsoft says your computer isn't supported, my flash drive can bypass all those requirements without you having to do the work of getting it compatible.
That being said, this is a development build. Be prepared for some instability. Windows 11 will not be available for commercial release until fall 2021 and developers are still working out bugs and issues.
PLEASE NOTE:
I've been getting messages from buyers that are confused so I'll clear this up briefly here. If you perform an in-place upgrade within Windows, the first prompt will say "Install Windows 10". THIS IS PERFECTLY NORMAL. Read my detailed instructions for performing an in-place upgrade by clicking here or scrolling down.
In-place upgrade vs. clean install
There are two methods to getting Windows 11 installed on your PC: (1) you can perform an in-place upgrade from within your existing Windows installation, or (2) you can boot from the flash drive directly and perform a clean installation.
A clean install is mostly foolproof because it does not require any sort of integrity from your existing Windows installation. Oftentimes, in-place upgrades will fail if your existing Windows install is riddled with malware or system files are corrupted. A clean install bypasses all of that by just wiping your hard drive and reinstalling a fresh operating system. However, a clean install will not preserve any of your data or programs already on your PC. When you do a clean install, you're starting from scratch—unless you backed up your files before and you move them back to your PC when you're done installing Windows. Another benefit of a clean install is it allows you to re-partition your drives or switch boot mode from Legacy to UEFI or vice versa, if your BIOS supports it.
An in-place upgrade, on the other hand, gives you the option to keep your personal files and apps, just your personal files, or it can also wipe your PC and start over similar to the clean install option. Sometimes these in-place upgrades can fail, however, due to your existing OS having integrity issues that make the update to Windows 11 break. But this is a great option to try first if you want to preserve your programs and files.
Instructions for an in-place upgrade
There are a few requirements in order to perform an in-place upgrade:
- Windows 7, 8, 8.1, or 10 has to already be installed on your PC and you have to be able to boot into it.
- You have to be able to log into an administrator account.
- You have to have enough free space on your hard drive for it to copy the Windows 11 files before installing them.
- You should not have any antivirus programs installed while doing the upgrade, as these can break things.
- You should not have any malware or corrupted system files. If you're unsure, uninstall suspicious applications through Settings > Apps & Features on Windows 10 or Control Panel > Uninstall a program on Windows 7, 8, or 8.1. Scan for malware using a tool like Malwarebytes. Repair system files by running dism.exe /online /cleanup-image /restorehealth and sfc /scannow in a Command Prompt window as admin before attempting the upgrade.
It is also worth noting that you cannot upgrade your Windows edition from Home to Pro if you perform an in-place upgrade; it will only install Windows 11 for the edition that you currently have installed. It is always possible to upgrade from Home to Pro after the in-place upgrade by going into your activation settings and changing your product key, but it cannot be done during the in-place upgrade.
If you meet all the requirements and don't mind the caveats, then proceed with the steps below.
Step 1:
Power on your PC, allow it to boot, and plug your flash drive into an available USB port. Navigate to the File Explorer and click into the flash drive that's been labeled "WINDOWS 11". Double click on the "setup.exe" file to run it.
Step 2:
A window will open that says "Preparing" with a percentage:
After it prepares the installer, you will be greeted with a window that says "Install Windows 10". That is perfectly normal. This flash drive I sell is made essentially by splicing together a Windows 10 ISO with a Windows 11 install.wim; that's what allows it to bypass the system requirements Microsoft has in place for Windows 11. Just hit Next.
Step 3:
From here, the installer will check for updates before asking you to accept the license terms. Just hit "Accept".
Step 4:
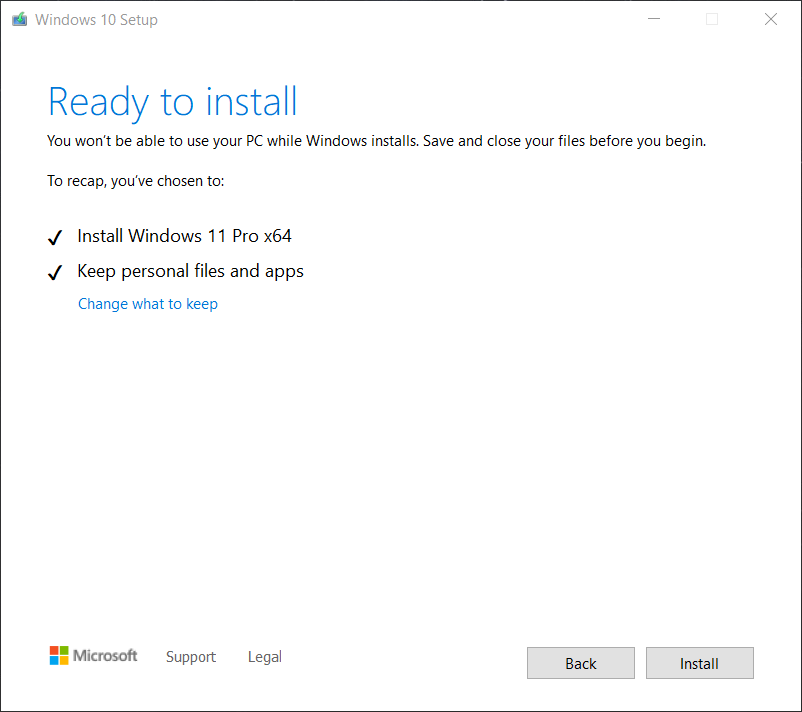
It will once again check for updates, before bringing you to a window confirming that you'll be installing Windows 11 x64 and keeping your apps and files. If it looks good, hit "Install".
If for some reason you don't want to keep personal files and apps, hit "Change what to keep" and select either "Keep personal files only" to remove your programs, as if you were performing a refresh, or select "Nothing" to remove everything on your PC, similar to a clean install.
Step 5:
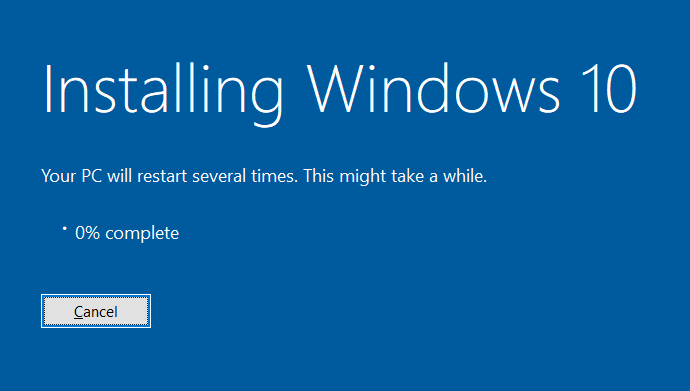
Congrats, you're installing Windows 11! The text within the window says "Installing Windows 10" but that's just a relict of the Windows 10 ISO my custom installer is made from. This step where it installs can take any where from 20 minutes to several hours depending on the speed of your PC, and your computer will restart several times and go through many installing/loading screens. You might run into an error halfway through that aborts the install. If that happens, you can refer to my instructions at the beginning that said to check for malware, repair system files, and make sure if you have an antivirus that you uninstall it before attempting the upgrade, if you skipped that. If you still have issues, even after that, you'll have to back up your important files and perform a clean install—the steps to which are provided down below.
Instructions for a clean install
Step 1:
For this method, we're going to need to boot from the flash drive instead of your PC's regular boot device, which is typically a hard drive or SSD. To do that, completely power down your PC. Plug the flash drive into a free USB port. Power on your PC and repeatedly press your computer's boot menu key in order to get to the boot menu. This key will differ depending on your model PC. For newer HP computers, it is F9. For Dells, F12. Many desktops use F11, Delete, or another key. If you're unsure of what your boot menu key is, you may see it listed on the splash screen when you initially power on your PC, like in the picture below for a Dell PC where it lists F12 as the boot menu key in the top-right corner.
Some PCs don't have a boot menu key or at least one that's enabled by default, so you may have to enter the computer's BIOS and change the boot order from within there. If you're confused or unsure, you can always Google your model computer with the words "boot menu key" or "boot from USB" attached, and you'll likely find what you're looking for. If all else fails though, you can always message me on eBay and I can try to help you out.
Once within the boot menu, use your arrow keys to navigate to the flash drive in the list, and then hit Enter:
Step 2:
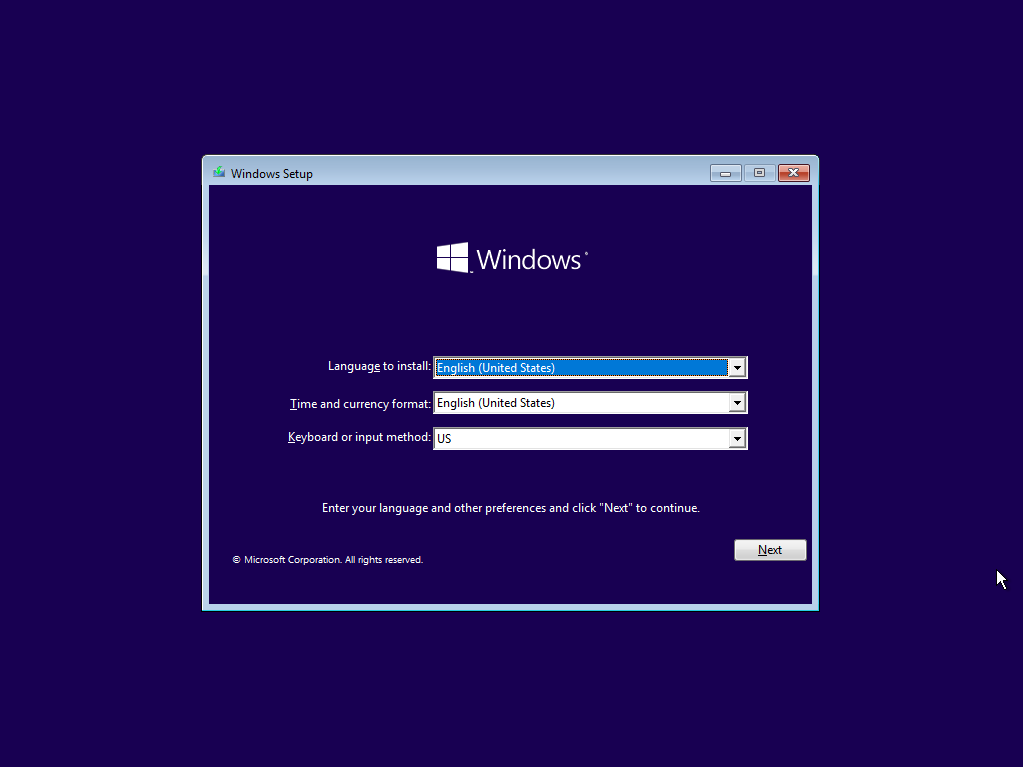
Allow the PC to boot from the flash drive. During that time, you might see a Windows logo and a loading animation, or you might just see a black screen. Regardless, let it load until you get to a screen that looks like the image below. From there, it's pretty straightforward. Select your language and keyboard method, and then hit Next.
Step 4:
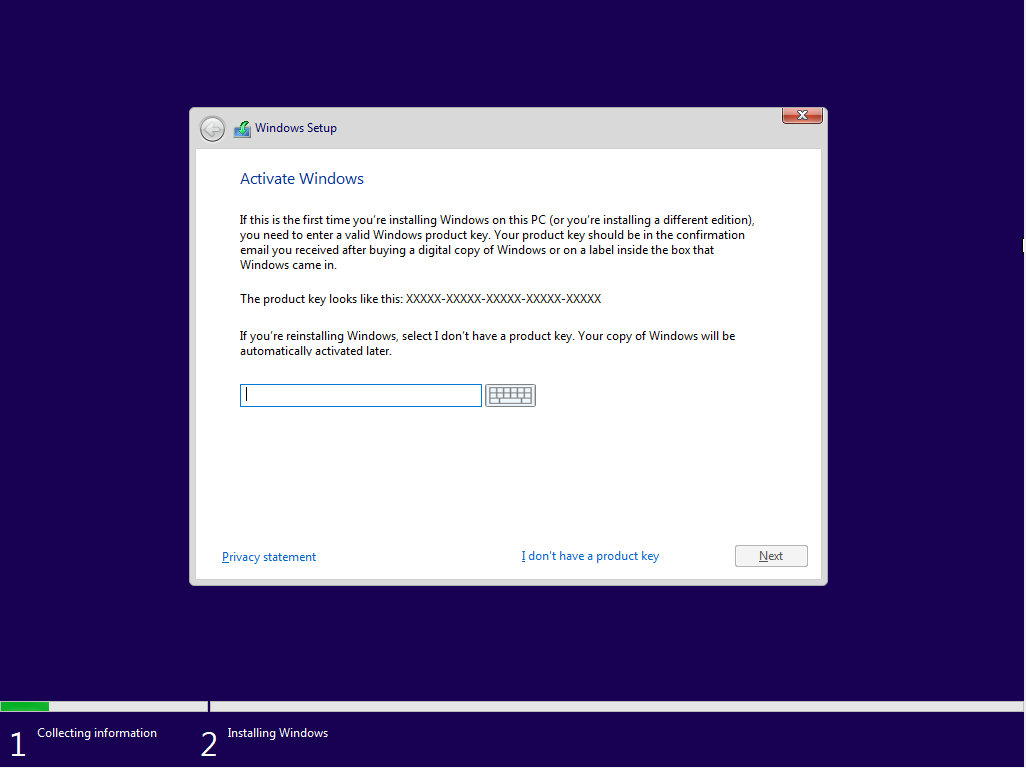
Enter your Windows product key if you have it available and hit Next. This step isn't very important if you've already had Windows 10 installed and activated on your PC, as you can skip and Windows 11 will automatically activate with your OEM Windows product key once you connect to the Internet for the first time. If you plan on using your existing Windows 7, Windows 8/8.1, or Windows 10 product key, be sure to install the appropriate edition of Windows 11 in the next step. If you don't have your product key on hand, just click "I don't have a product key".
Step 5:
Select the appropriate version and hit Next. All are 64-bit. As mentioned in step 4, if you plan on using your Windows 7/8/10 product key for Windows 11, select the appropriate edition. If your PC only ever had an activated Windows 10 Home install, then you'd want to install Windows 11 Home. Similarly, if you have a Windows 7 Home Premium OEM key for your PC, install Windows 11 Home.
Editions available to install: Windows 11 Home, Windows 11 Home N, Windows 11 Home Single Language, Windows 11 Pro, Windows 11 Pro N, Windows 11 Pro Education, Windows 11 Pro Education N, Windows 11 Pro for Workstations, Windows 11 Pro N for Workstations, Windows 11 Education, Windows 11 Education N, Windows 11 Enterprise, Windows 11 Enterprise N
Step 7:
Select "Custom: Install Windows only (advanced)". Selecting the option to keep your files and apps will just direct you to boot into Windows and perform an in-place upgrade. If you want to perform an in-place upgrade, then instructions are provided for that above.
Step 8:
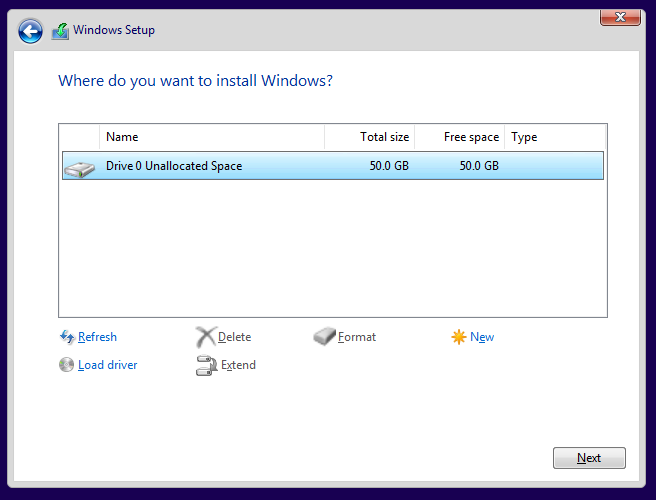
For a true clean install, select all the drive partitions that appear in the table and click Delete for all of them. Once you're left with no partitions, just "Drive 0 Unallocated Space", select it and click Next. Of course, removing your drive partitions erases your hard drive's contents, so do this at your own caution. Ensure your data is backed up if you have anything you care about on your hard drive.
Step 9:
That's about it! Windows 11 is now installing. It will go through the steps, first copying the files, preparing them for installation, and then finally installing them. You'll be at this screen for probably about 5-10 minutes, depending on the speed of your computer.
Step 10:
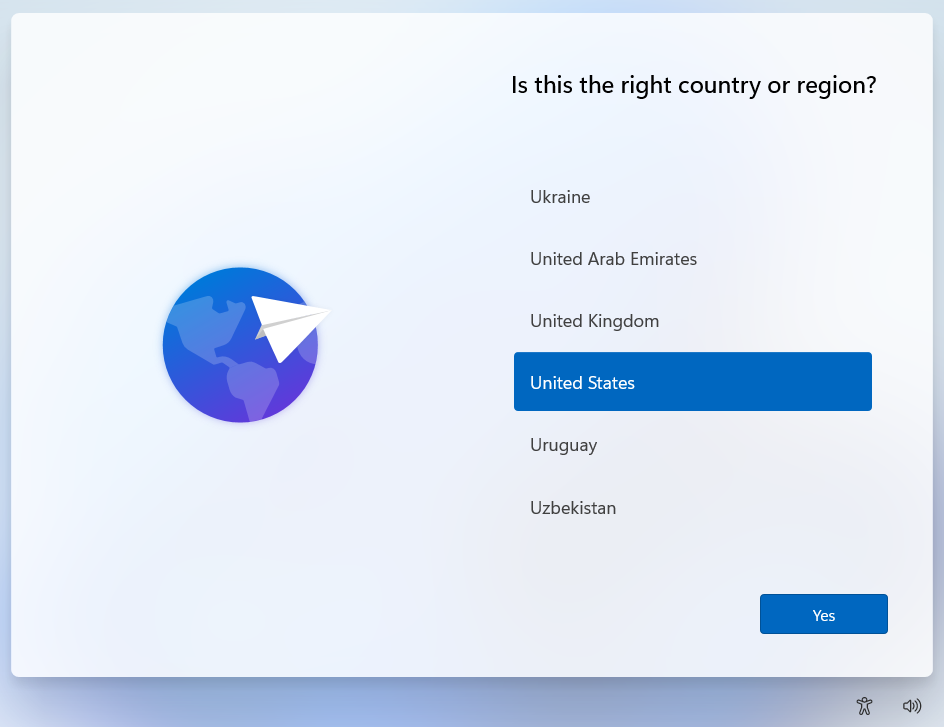
When it's done installing, your PC will restart, at which time you can unplug your flash drive. After some loading and "Getting devices ready", you should be brought to the Windows 11 welcoming screen. From here, just set up your new Windows install by configuring your language, region, username, and password.


